


Next: Use Cases validation
Up: UCEd Use Cases Edition
Previous: Use Case models edition
Contents
The following shows the initial view
of a newly created
normal use case.
Figure 4.6:
Initial description of a new use case in the editor.
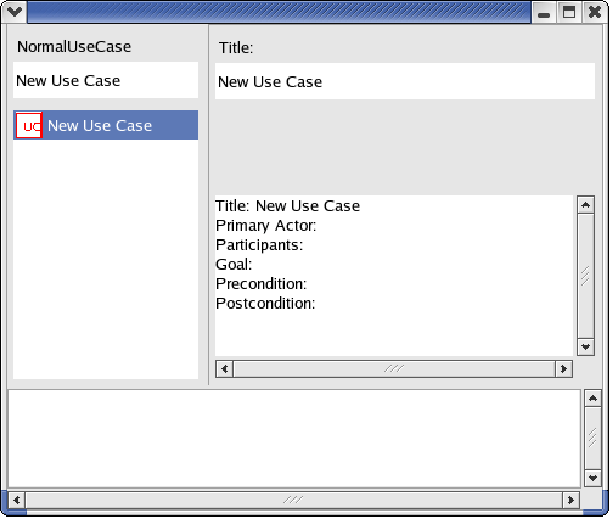 |
The description panel shows lines labeled with the use case fields
Title, Primary Actor, Participants, Goal,
Precondition, and Postcondition (only Title would
be shown for an extension use case). These fields may be edited
by selecting the corresponding line and entering a field value through
the use case description edition area.
The first line in a use case procedural part is created by:
- selecting the last line (Postcondition line for a
normal use case, Title line for an extension use
case), and
- typing the key combination CTRL+ to insert a new line.
The following shows the
editor after
insertion of the procedural part first line.
Figure 4.7:
Description of a new use case in the editor after the first
step creation.
 |
For a normal procedure, the first line created is a
Step. A Part is created in the case of an
extension procedure.
A use case procedural part is edited by selecting a line in the
use case description edition area, and using a key
combination. In
addition:
- CTRL F1
- inserts an extension point after the current
line (for normal use cases only).
- CTRL F2
- inserts an any extension to the use case
(for normal use cases only).
The editor does lines labeling automatically.
- For a Part
- CTRL+
- inserts a part after the selected part.
- CTRL-
- deletes the selected part.
- CTRL

- indents the selected part as a Step
of the preceding Part (if the selected line is not the
first line).
- CTRL

- has no effect on parts.
- CTRL

- has no effect on parts.
- CTRL

- transforms the selected part to a Step
of the preceding Part (if the selected line is not the
first line).
- For a Step
- CTRL+
- inserts a step after the selected step.
- CTRL-
- deletes the selected step.
- CTRL
- indents the selected Step as an Extension
of the preceding Step (if the selected line is not the
first line).
- CTRL
- has no effect on steps.
- CTRL
- has no effect on steps.
- CTRL
- transforms the selected Step to an Extension
of the preceding Step (if the selected line is not the
first line).
- For an Extension
- CTRL+
- inserts an Operation instance as an action of
the Extension.
- CTRL-
- deletes the Extension.
- CTRL
- indents the selected Extension as an action
Operation instance of the preceding Extension (if the selected line
is not the first Extension of a Step).
- CTRL
- outdents the selected Extension as a Step
- CTRL
- transforms the selected Extension to a Step (if
it has no children).
- CTRL
- transforms the selected Extension to an
Extension action Operation instance
of the preceding Extension (if the selected line is not the
first Extension of a Step).
- For an Extension action Operation instance
- CTRL+
- inserts an Operation instance as an action of
the Extension.
- CTRL-
- deletes the action.
- CTRL
- has no effect on an Extension action.
- CTRL
- outdents the selected Extension action as an
Extension.
- CTRL
- transforms the selected Extension action to an
Extension.
- CTRL
- transforms the selected Extension action
Operation instance to a Branching statement.
- For an Extension action Branching statement
- CTRL+
- inserts an Extension to the selected Branching statement
Step.
- CTRL-
- deletes the Branching statement.
- CTRL
- has no effect on an Extension action.
- CTRL
- outdents the selected Branching statement as an
Operation instance.
- CTRL
- transforms the selected Branching statement to an
Operation instance.
- CTRL
- has no effect on a Branching statement.
- For an Extension Point
- CTRL+
- inserts a Step after the selected Extension Point.
- CTRL-
- deletes the Extension Point.
- CTRL
- has no effect on an Extension Point.
- CTRL
- has no effect on an Extension Point.
- CTRL
- has no effect on an Extension Point.
- CTRL
- has no effect on an Extension Point.
Next: Use Cases validation
Up: UCEd Use Cases Edition
Previous: Use Case models edition
Contents
Stephane S. Some
2005-01-25